Tabs3 PracticeMaster
Connecting your Tabs3 PracticeMaster calendar is simple. Once connected, Clientping will watch your calendar for upcoming appointments, send text message reminders, and allow your clients to confirm.
Sync Tabs3 PracticeMaster
You'll first need to replicate your Tabs3 PracticeMaster calendar with a Microsoft Outlook calendar. Doing this will keep your Tabs3 PracticeMaster calendar 2-way synchronized with Microsoft. Changes on your Tabs3 PracticeMaster calendar will be reflected on the Microsoft calendar, and vice versa. You don't need to log in or use the calendar you sync to, this just allows Clientping to connect, monitor for appointments, and if you choose, update appointment titles to reflect their status.
For instructions on how to connect Tabs3 PracticeMaster to Microsoft:
Sync Tabs3 PracticeMaster with Microsoft
Once complete, go back to Clientping.
Add your Microsoft Calendar
Start by choosing Microsoft Outlook.
You will be redirected to the Microsoft's website, where you will be prompted to login. If you were already logged in, you instead may be sent to the next step.
Allow Clientping access
After logging in, you will be presented with the calendar's standard screen for allowing access for Clientping. Choose 'Allow access'. Clientping does not in any way share or access your data for ANY reason. You can see our statement on privacy here.
Choose your calendar
After allowing access, you'll be shown a list of the calendars you have set up in the calendar you chose. Click the calendar you want to connect to Clientping. Your main calendar will often just be called "Calendar."

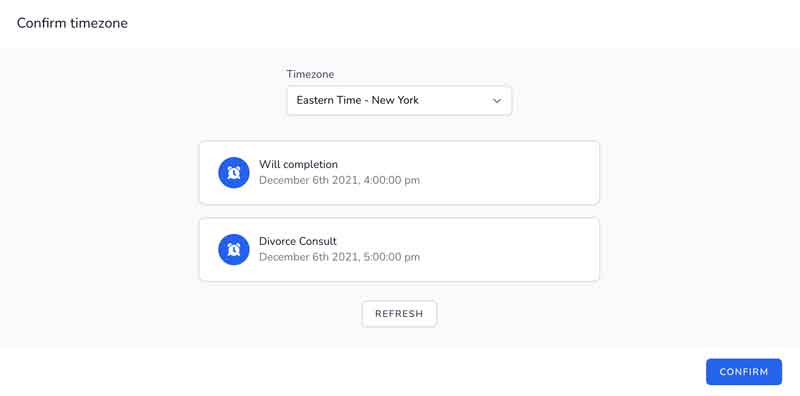
Confirm your timezone
Clientping will show you a list of upcoming appointments over the next five days from the calendar you chose above. Make sure the time of the appointments is correct. If it is incorrect, choose the correct timezone. This setting is critical, as it determines what times will be displayed for your clients in reminder messages. If you don't have any upcoming appointments, add one to your calendar and click "refresh." Once you've confirmed the times are correct, click "confirm."

Calendar settings
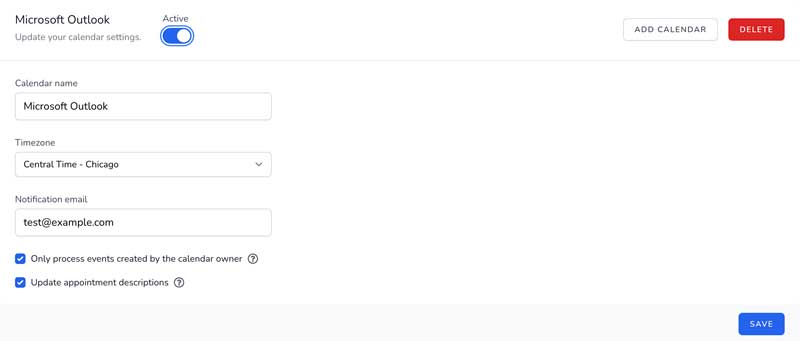
These settings are accessed from the "Calendars" tab on the left hand navigation bar.

Active / Turn On toggle
When the calendar is "active" Clientping will automatically watch for upcoming appointments. New appointments that match your reminder rules will be sent text or email reminder messages.
When this toggle is turned off, Clientping will not monitor the calendar. No action will be taken for your appointments.
Add Calendar
This button will add additional calendars to your account. Each calendar has its own reminder rules, settings, and notification email.
Delete Calendar
This button will delete your calendar and all related appointments from Clientping. This will not change your Microsoft calendar events in any way.
Calendar Name
This is only for your reference so you can quickly identify which of your calendars you are currently working with.
Calendar Timezone
This is the timezone you chose when confirming your calendar settings above. You can change this if necessary. Please note: this setting is critical, as it determines the time your client is shown in their appointment reminders.
Notification Email
This is the email that should receive notifications for this calendar. Notifications include:
- Declined appointments
- Rescheduled appointments
- Text messages received from clients (besides YES and NO)
Only process events created by the calendar owner
When checked, reminders and other messages will only be sent to events on this calendar added by the calendar owner. When unchecked, Clientping will send reminders for any appointment with a phone number even if the calendar owner is just an invitee. If you are monitoring a shared calendar, or you want to have Clientping process all appointments on this calendar whether the owner was the creator or not, uncheck this box.
Update Appointment Descriptions
When checked, any appointment that has multiple phone numbers will also have its calendar description updated for the status of each attendee (reminded, confirmed, etc). This will append to the top of your calendar event description and not change the rest of the description.
